
How to Clean an Air Cooler Safely at Home
If you are wondering how to clean an air cooler at home, start with the parts that normally collect water, dust and mineral deposits: the water tank, cooling pads and accessible exterior surfaces. Always switch off and unplug the cooler before cleaning, and follow the instructions in your specific model’s manual.
One important clarification comes first: a household evaporative air cooler is not the same as a charge-air cooler used in an engine. The cleaning steps below are for a household air cooler.
What You Need Before Cleaning
For basic household air-cooler cleaning, keep the process simple. Depending on your cooler and the manufacturer’s instructions, you may need:
- Clean water
- A soft cloth
- A soft brush or sponge
- A mild cleaning solution suitable for the cooler
- A container or suitable place for draining water
Do not use aggressive chemicals, excessive force or high-pressure water unless the manufacturer specifically permits it for your model.
Step 1: Switch Off and Unplug the Air Cooler
Before touching the tank, pads or accessible internal surfaces, switch off the cooler and unplug it from the electrical supply.
Do not begin cleaning while the cooler is connected to power.
If the cooler has an electrical fault, damaged wiring, burning smell, repeated tripping or signs of electric shock, stop using it and arrange professional inspection instead of attempting an electrical repair yourself.
Step 2: Drain the Water Tank
Drain the remaining water from the tank using the cooler’s drain plug, valve or the procedure specified in the owner’s manual.
Do not leave stagnant water sitting in the cooler unnecessarily. Regular draining and cleaning can help reduce residue, unpleasant odors and buildup.
Once the tank is empty, inspect it for visible dirt, scale, cracks or other damage.
Step 3: Clean the Water Tank
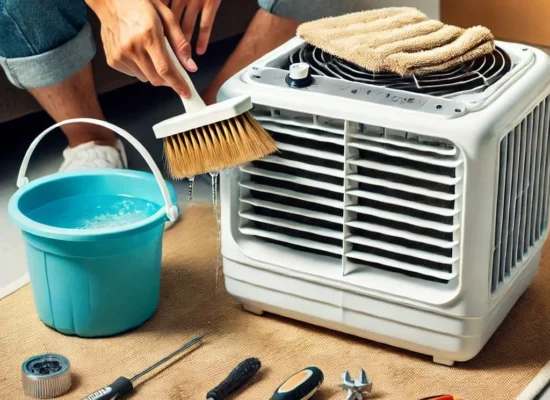
Wipe the inside of the tank with a soft cloth or sponge.
For normal dirt and residue, use a mild cleaning approach recommended by the manufacturer. Gently clean corners and accessible areas where deposits may collect.
After cleaning, rinse the tank thoroughly so that cleaning residue does not remain in the water system.
If you see heavy mineral scaling that does not come away with normal cleaning, check the manufacturer’s instructions before using a descaling product. Different cooler materials and components can have different cleaning requirements.
Step 4: Clean the Cooling Pads
Cooling pads are important to evaporative cooling because air passes through the wet pads.
If your model has removable pads and the manufacturer allows user removal, take them out carefully.
Rinse the pads using an appropriate, gentle flow of clean water. Avoid aggressive scrubbing that could damage the pad material.
Do not assume that every cooling pad should be soaked in vinegar, acid or another household chemical. The correct cleaning method depends on the pad material and the manufacturer’s instructions.
Some manufacturer guidance specifically warns against high-pressure water or unsuitable acidic cleaning methods for cooling pads.
Allow cleaned pads to dry appropriately before reinstalling them if the manufacturer’s instructions call for drying.
Step 5: Clean Accessible Fan and Exterior Surfaces
Dust can accumulate around accessible fan blades, grills, louvers and the outside of the cooler.
With the appliance unplugged, wipe accessible surfaces using a soft cloth or use the cleaning method specified by the manufacturer.
Do not insert your hands or tools into areas containing electrical components or moving mechanisms.
If the fan is damaged, unusually loose, rubbing against another component or producing abnormal noise, stop and arrange an inspection rather than attempting an internal repair.
Step 6: Check the Water Distribution System
After cleaning, look at the accessible water-distribution areas.
The purpose is to confirm that water can reach the cooling pads properly when the cooler is operating.
If the pump does not circulate water, water distribution is uneven, or the cooler leaks from an internal component, do not assume that additional cleaning will solve the problem. The pump, hose, valve, tank or another component may require inspection.
Step 7: Rinse and Reassemble Carefully
Make sure the cleaning solution and loose debris have been rinsed away.
Reinstall removable components according to the manufacturer’s instructions.
Do not force a pad, cover, grill or panel into position. If a component does not fit correctly after cleaning, check the manual or arrange professional assistance.
Step 8: Refill With Clean Water and Test the Cooler
Once cleaning is complete, refill the tank with suitable clean water according to the manufacturer’s instructions.
Reconnect power only after the parts that were cleaned have been correctly reinstalled and the exterior is dry.
Then test the cooler.
Check for:
- normal airflow
- normal water circulation
- unusual noise
- water leakage
- unusual smell
- abnormal vibration
If the cooler works normally, regular maintenance can help keep the tank, pads and airflow paths in better condition.
How Often Should You Clean an Air Cooler?
There is no single cleaning interval that applies to every air cooler.
The appropriate frequency depends on factors such as:
- how often the cooler is used
- dust levels
- water quality
- mineral buildup
- local environment
- cooler design
- manufacturer’s instructions.
During periods of frequent use, inspect the tank and cooling pads regularly rather than waiting until cooling performance becomes poor.
If you notice visible buildup, unpleasant odor, reduced airflow or declining cooling performance, the cooler may need attention sooner.
What If the Air Cooler Still Smells After Cleaning?
A persistent smell can have several possible causes.
Possible causes include:
- stagnant water
- residue inside the tank
- dirty or worn cooling pads
- buildup in water-distribution areas
- another component requiring inspection.
Drain and clean the accessible areas first.
If the odor continues after proper cleaning, avoid repeatedly adding stronger chemicals without checking the manufacturer’s instructions. Professional inspection may be more appropriate.
What If the Air Cooler Is Still Not Cooling After Cleaning?
Cleaning is only one possible solution.
Poor cooling may also be associated with:
- blocked or worn cooling pads
- insufficient water circulation
- a pump problem
- airflow restriction
- fan or motor problems
- unsuitable operating conditions
- another mechanical or electrical fault.
Start with the customer-safe checks described in the owner’s manual.
If cleaning does not restore normal operation, the exact fault should be diagnosed rather than assuming that another round of cleaning will solve it.
When Should You Call a Technician?
Professional service is appropriate when:
- the cooler does not start
- the motor or fan behaves abnormally
- the water pump does not circulate water
- there is significant water leakage
- wiring or electrical components appear damaged
- the cooler repeatedly trips electrical protection
- there is a burning smell
- there is unusual vibration or mechanical noise
- cooling remains poor after normal cleaning
- a component needs removal or replacement.
Electrical, motor and internal-component repairs should not be treated as ordinary DIY cleaning.
Air Cooler vs Charge-Air Cooler: What Is the Difference?
The terms sound similar, but they describe different equipment.
A household evaporative air cooler uses water, cooling pads and airflow to provide evaporative cooling.
A charge-air cooler, also called a charge-air cooler or intercooler in many engine applications, is part of an engine’s intake system. It cools compressed air before that air enters the engine’s intake system.
Because the equipment is different, the cleaning procedures are also different.
The water-tank and cooling-pad cleaning steps in this article are not instructions for cleaning an automotive or industrial charge-air cooler.
If you were actually searching for instructions for an engine charge-air cooler, use the vehicle, engine or equipment manufacturer’s service documentation instead of applying household air-cooler cleaning instructions.
Can I Clean My Air Cooler Myself?
Basic maintenance such as draining the tank, cleaning accessible surfaces and maintaining suitable cooling pads can often be performed by the owner when the manufacturer’s instructions permit it.
However, DIY cleaning is different from repair.
Do not attempt electrical, motor, wiring, pump or other internal repairs unless you have the appropriate technical knowledge and safety procedures.
Should I Use High-Pressure Water to Clean the Cooler?
Do not assume that high-pressure water is safe.
The appropriate water pressure depends on the component and manufacturer instructions. Some manufacturer guidance specifically warns against high-pressure water for cooling-pad cleaning.
Use a gentle cleaning method unless your model’s documentation specifically permits another approach.
Can I Use Vinegar or Acid to Clean the Cooling Pads?
Do not automatically use vinegar, acid or another chemical because a general online article recommends it.
Cooling-pad materials vary, and the wrong chemical or concentration can damage components.
Use the cleaning method specified by your cooler manufacturer. If heavy mineral deposits remain, professional cleaning may be safer than experimenting with chemicals.
Why Is Regular Air Cooler Cleaning Important?
Regular cleaning helps keep the water tank, cooling pads and accessible airflow areas free from unnecessary dirt and residue.
A neglected cooler may develop:
- unpleasant odors
- reduced airflow
- mineral buildup
- dirty cooling pads
- poor water distribution
- reduced cooling performance.
Cleaning alone cannot prevent every fault, but it is an important part of routine air-cooler maintenance.
Need Professional Air Cooler Service in Hyderabad?
If routine cleaning does not solve the problem, or your air cooler has a motor, pump, electrical, leakage or other repair issue, Air Cooler Clinic provides doorstep/service-area air-cooler repair and maintenance in Hyderabad and applicable service areas, subject to availability.
When contacting the service team, provide:
- your location
- cooler brand
- model if available
- main problem
- when the problem started
- any unusual noise, smell or leakage.
Call Air Cooler Clinic: 7997100067
Email: aircoolerclinic@gmail.com
Frequently Asked Questions
How do I clean an air cooler at home?
Switch off and unplug the cooler, drain the tank, clean the tank and accessible surfaces, clean the cooling pads according to the manufacturer’s instructions, rinse appropriately, reinstall the components and test the cooler safely.
How often should I clean my air cooler?
The interval depends on usage, dust, water quality, cooler design and manufacturer guidance. Inspect and clean the tank and pads regularly during periods of frequent use.
Can I wash air cooler cooling pads?
Many removable cooling pads can be rinsed according to the manufacturer’s instructions. Avoid aggressive scrubbing, unsuitable chemicals and excessive water pressure.
Why does my air cooler smell bad after cleaning?
Possible causes include remaining residue, stagnant water, dirty pads, mineral buildup or another component that needs inspection. If normal cleaning does not resolve the smell, professional service may be appropriate.
What if my air cooler is leaking?
If the leak is significant, switch off and unplug the cooler. Avoid opening electrical components. Identify the source only if you can do so safely, and arrange professional inspection when necessary.
Is a charge-air cooler the same as a household air cooler?
No. A household evaporative air cooler uses water and cooling pads for room cooling. A charge-air cooler is an engine-system component used to cool compressed intake air.
Can I repair the air cooler motor myself?
Motor and electrical repairs should not be treated as routine DIY cleaning. Arrange professional inspection if the motor, wiring or electrical components are faulty.
Conclusion
Cleaning an air cooler does not have to be complicated when you focus on the right components and follow the manufacturer’s instructions.
Start by disconnecting power, draining the tank, cleaning the water tank and maintaining the cooling pads. Clean accessible surfaces carefully and check the cooler after reassembly.
If cleaning does not solve poor cooling, unusual noise, leakage, pump problems or electrical symptoms, the issue may require diagnosis rather than more cleaning.
And remember: a household evaporative air cooler is not the same as an engine charge-air cooler. Always use equipment-specific maintenance instructions.
For household air-cooler repair and maintenance in Hyderabad and applicable service areas, contact Air Cooler Clinic at 7997100067.